We need your feedback!
Please take the following survey after completing Lab 1. As you go through the lab, remember or write down how helpful each video is, what could be made better, what you struggled with, etc. We will take any feedback we can get!
Please take the following survey after completing Lab 1. As you go through the lab, remember or write down how helpful each video is, what could be made better, what you struggled with, etc. We will take any feedback we can get!
Lab 1
Lab 1 will give you a full introduction to the reference materials available to you, give a quick overview of Spyder and debugging tips, and show you how to create a script. You will then be guided in creating sketches via the Fusion 360 API. The sketches created will be used in Lab 2 to assist in building the pulley geometry.
Objective
Create a basic understanding of scripts, Spyder, and sketches.
Deliverables
Use Fusion 360 to create a new script, then use Spyder to edit the script. Create a sketch on the XY plane, and add a circle to the sketch. Repeat this to create another sketch with another circle.
Lab Practices
As you work through Lab 1, there will be prompts to practice the principles just taught. Each lab practice will complete a portion of the overall lab project. By completing the lab practices, much of the work needed in open lab will already be complete. If you decide to skip the lap practices, the entire lab project can still be completed during the open lab portion.
Reference Material
There are many resources and references to help in learning the Fusion 360 API. This reference material will provide insight into the API structure, syntax, needed parameters, etc. Learning how to navigate and extract information from the reference material will expand your future API coding possibilities and skills. The following video provides an overview of the available resources. The main help page with links to all the reference material can be found here.
Lab Practice
Go through the documentation and get familiar with the different sections. Look up material on creating sketches, and find sample code. Find and read through the needed syntax and parameters to create a sketch.
Go through the documentation and get familiar with the different sections. Look up material on creating sketches, and find sample code. Find and read through the needed syntax and parameters to create a sketch.
Creating, Editing, and Running Scripts
For Lab 1 we will be creating the sketches that will be used to make the pulley body. The video below explains the basic steps in creating, editing, and running your scripts.
Lab Practice
Create a new script for your lab project. Run the newly created script. You should get a dialog box that says “Hello Script”.
You have now created a script. You can use this script to create you code for the lab project. In the Scripts and Add-Ins dialog box, you can highlight your newly created script and hit “Edit”. This will pull up Spyder to edit your code.
Document Structure
Once you have created a script file, you can use Spyder to edit your script. In order to begin writing your scripts, you must understand the Fusion 360 document structure and the Object Model. The following video discusses that topic as well as the important first few lines of code in your script.
Lab Practice
Edit you newly created script. Your script should already have accessed the Application and User Interface. Go one step further and access the active product and the root component. The root component will be used later when creating sketches. Change the line of code that says “Hello Script” to something unique, and make sure the code still runs correctly.
Edit you newly created script. Your script should already have accessed the Application and User Interface. Go one step further and access the active product and the root component. The root component will be used later when creating sketches. Change the line of code that says “Hello Script” to something unique, and make sure the code still runs correctly.
Sketches and Circles
Once you have a script and have accessed the correct document and component, you can begin modeling through your program. We will first learn how to navigate the object model to create a sketch and draw circles within the sketch in the next video.
Lab Practice
Practice creating a sketch, and adding a single circle to the sketch. Make the sketch lie on the xy plane. Center the circle at the origin, and give it a radius of 2 cm. Pseudo code is given in the Open Lab section, and you can use the beginning portions of the Pseudo code to create the sketch and circle.
Practice creating a sketch, and adding a single circle to the sketch. Make the sketch lie on the xy plane. Center the circle at the origin, and give it a radius of 2 cm. Pseudo code is given in the Open Lab section, and you can use the beginning portions of the Pseudo code to create the sketch and circle.
Debugging Tools
The Spyder IDE, like most IDE’s, has built in tools to help debug your python code. The following video will introduce you to some of these tools. It will discuss warning messages, creating error message boxes, breakpoints, and how to step through your code.
Lab Practice
Use the given code to produce an error message in a message. Also practice inserting breakpoints and stepping through the code.
Use the given code to produce an error message in a message. Also practice inserting breakpoints and stepping through the code.
Open Lab
Objective
Create a basic understanding of scripts, Spyder, and sketches.
Deliverables
Use Fusion 360 to create a new script, then use Spyder to edit the script. Create a sketch on the XY plane, and add a circle to the sketch. Repeat this to create another sketch with another circle (having separate sketches for each circle will make it easier to extrude the circles in Lab 2). The first circle should be centered at the origin with a radius of 2 cm. The second circle should be centered on the first circle, as pictured below, with a radius of 0.156 cm. As the first circles radius changes, the location of the second circle should move accordingly to remain centered on the first circle. Define the circles’ radii as variables, and the values should be entered in the units of cm (the default Fusion API unit). When your code is ran, you should have two sketches, with two circles, similar to the picture below.
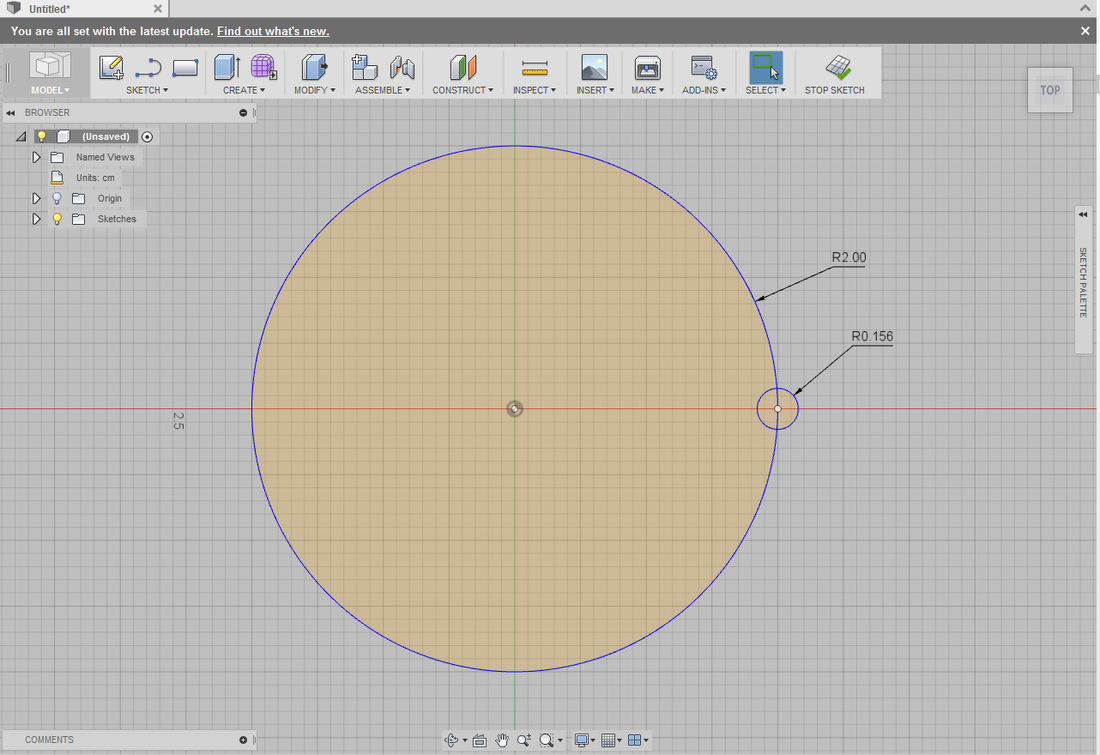
This sketch will be used in Lab 2. The first circle will create the pulley body, with the second circle used to cut out the pulley teeth.
Pseudo Code
The pseudo code below is just a basic outline of what your script could look like. This will help you remember which portions of code need to be included and which parts of the object model need to be accessed.
import adsk.core, adsk.fusion, traceback
def run(context):
ui = None
try:
# Define the radius variables for circle1 and circle2
# Get the Application and User Interface, used for outputting the message box to the user
# Get the Root Component of the active design
## Create sketch 1 on the xy plane.
# First access the sketches collection of the root component
# Get the xy construction plane from the root component
# Add sketch 1 to the sketch collection using the xy plane
## Draw a circle in the sketch.
# Access the sketchcurves and sketch circles collections within sketch 1
# Add a circle to the sketch circles collection by using addByCenterRadius.
# The needed parameters are the center point and radius.
## Create sketch 2 on the xy plane.
# Add sketch 2 to the same sketch collection using the same xy plane
## Draw a circle in the sketch. You will need to grab again the sketchCircles collection from sketch 2.
# To create the origin of the second circle on the first circle,
# use the radius of the first circle as the x coordinate when creating the 3Dpoint
except:
if ui:
ui.messageBox('Failed:\n{}'.format(traceback.format_exc()))
