We need your feedback!
Please take the following survey after completing Lab 4. As you go through the lab, remember or write down how helpful each video is, what could be made better, what you struggled with, etc. We will take any feedback we can
Please take the following survey after completing Lab 4. As you go through the lab, remember or write down how helpful each video is, what could be made better, what you struggled with, etc. We will take any feedback we can
Lab 4
Lab 4 will introduce you to commands and to the Fusion 360 Graphical User Interface (GUI). You will create two new toolbar buttons which will run the code you wrote in Labs 2 and 3.
Objective
Create a basic understanding of commands, event handlers, InputCommands, and the GUI.
Deliverables
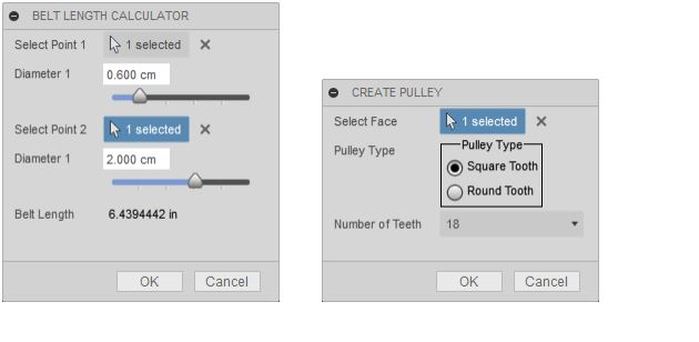
Create an add-in for Fusion 360 that adds two buttons onto the toolbar and two dialog boxes, shown below. One button, when clicked, will bring up a dialog box to run the belt calculator code from Lab 2. The other button will bring up a dialog that will allow you to create pulleys on selected shafts in the 3D printer model according to the code written in Labs 2 and 3. See the Open Lab section at the end of this handout for a clearer idea of what you will be working on in this lab. Note: this lab may take longer to complete than the previous labs.
Lab 4 will introduce you to commands and to the Fusion 360 Graphical User Interface (GUI). You will create two new toolbar buttons which will run the code you wrote in Labs 2 and 3.
Objective
Create a basic understanding of commands, event handlers, InputCommands, and the GUI.
Deliverables
Create an add-in for Fusion 360 that adds two buttons onto the toolbar and two dialog boxes, shown below. One button, when clicked, will bring up a dialog box to run the belt calculator code from Lab 2. The other button will bring up a dialog that will allow you to create pulleys on selected shafts in the 3D printer model according to the code written in Labs 2 and 3. See the Open Lab section at the end of this handout for a clearer idea of what you will be working on in this lab. Note: this lab may take longer to complete than the previous labs.
Add-Ins
Fusion 360 add-ins differ from scripts like you wrote previously. Scripts are run once, perform an action, and then terminate. If you want to perform the script’s functions again, you must run the script again. An add-in, on the other hand, permanently adds new functionality into Fusion 360, like new toolbar buttons, custom features, or other types of plugins that run in the background. Add-ins can be started and stopped manually from the “Scripts and Add-Ins” dialog or they can be set to run when Fusion 360 launches. The video below shows how to create an add-in and discusses some of the differences.
Lab Practice
Create a new add-in for your lab project. Run the newly created add-in. You should get a dialog box that says “Hello addin”. If you stop your add-in, you should get a dialog box that says “Stop addin”. You have now created an add-in. You can use this add-in file to create your code for the lab project. In the Scripts and Add-Ins dialog box, you can highlight your newly created add-in and hit “Edit”. This will pull up Spyder to edit your code.
Intro to Commands
Once you have created the add-in file, open it in Spyder. You may notice that an add-in includes the familiar run() function as well as a new stop() function. The run() function is called as soon at the add-in starts up and the stop function is called when you stop the add-in or when Fusion 360 is closed (which also stops the add-in).
Commands in Fusion 360 are what make actions happen. When you click on a button in a toolbar a command is run, such as to open a dialog box. A dialog box may run a command, too, when the “OK” button is pressed to create a feature or other action. When a command is activated it fires an event, like a “button clicked” event. An event handler captures this event, when it happens, and allows us to do some sort of action, such as create a feature with the information that was input into a dialog box. The Fusion 360 online help page for Commands can be accessed by clicking the button below.
Commands in Fusion 360 are what make actions happen. When you click on a button in a toolbar a command is run, such as to open a dialog box. A dialog box may run a command, too, when the “OK” button is pressed to create a feature or other action. When a command is activated it fires an event, like a “button clicked” event. An event handler captures this event, when it happens, and allows us to do some sort of action, such as create a feature with the information that was input into a dialog box. The Fusion 360 online help page for Commands can be accessed by clicking the button below.
The help page includes a sample script that demonstrates the usage of commands, event handlers, and CommandInputs in dialog boxes. Keep in mind that the example is a script, not an add-in, so it works just a little bit differently than your add-in. Also, the sample code has all of the commands added to tabs. We will not be using tabbed dialogs for this lab. CommandInputs should be added directly to the command’s commandInputs property.
For this lab you will need a few files which are provided for you here. This zip file contains the pulley file you imported in Lab 3 and a folder called “resources” with icon files. Both the .f3d file and the “resources” folder need to be unzipped into the same folder as your add-in python code file.
The following video shows how to initiate a command and add a button for your command to the toolbar. This done through command definitions and command controls.
Event Handlers
Once you have defined the command and added it to the toolbar you will need an event handler. An event handler will notify Fusion 360 if your button is ever pressed and what it should do after that. The video below discusses events and event handlers.
Lab Practice
We will start creating the dialog box for the belt length calculator. Create a command that has a button in the toolbar using the provided icon file. In the commandCreated event handler add a readonly textBoxCommandInput which shows a message of your choice. Example:
We will start creating the dialog box for the belt length calculator. Create a command that has a button in the toolbar using the provided icon file. In the commandCreated event handler add a readonly textBoxCommandInput which shows a message of your choice. Example:

Command Inputs
Commands usually require some sort of user input, like a number, a check box option, or a selected element from the design. A dialog box is initialized by the command, within the handler for the commandCreated event, to collect this user input. Each piece of information is collected with a commandInput object, which can be a selection input, a text box, a check box, etc. Command inputs are added to the dialog box in the order they are created in your code. When the user is done making input and clicks the OK button the “execute” command is fired. Sometimes you need to run some code when the user makes any input into the dialog, so the inputchanged event can be useful there. All of the code required to create the dialog box should be put in its associated commandCreated event handler. This includes the code to add the execute or inputChanged events to the command. The following video discusses command inputs.
Lab Practice
Add two selection command inputs and two slider command inputs to your belt button event handler you created in the previous practice (above). The sliders should use any number of values between 0.5 and 5.0. The selectionCommandInputs should have the limits set to one selection and the selection filter set to “CylindricalFaces”. Create an event handler for the inputChanged event for the dialog. Inside the inputChanged event handler you need to get the entities selected by the selection inputs and the numerical values of the sliders. Get the centroid points associated with the selected faces. Use your belt length calculator code from Lab 2 to calculate the belt length required. Set the text command input’s “text” property equal to the calculated belt length.
The previous videos give you all the separate pieces to create a command for you add-in. The following video gives additional information on certain types of event handlers as well as some hints regarding the stop function. It will also give an overview of how all the previously discussed topics fit together.
Lab Practice
Add a new command definition and toolbar button for the pulley generator to your run() function. Make a new commandCreated event handler for it. Be sure to keep your ID strings unique. Add a selection command input, a dropDownCommandInput (text list type) and a radioButtonGroupCommandInput to that event handler. The selectionCommandInput should use the same settings as the ones from the previous practice. The dropdownCommandInput should use a list of ints with values from 12 to 20. The radioButtonGroup should have two options: “Square Tooth” and “Round Tooth”. Create an event handler for the execute event for the dialog. Within the execute event handler you should get the cylindrical face the user selected as well as its radius. Also get the number of teeth the user chose in the dropdown and check which type of pulley the user selected with the radio buttons. Depending on what type of pulley they chose, invoke your Lab 2 pulleygenerating code (Round Tooth) or your Lab 3 code (Square Tooth) to create a pulley. You are almost done with this lab.
See the next section for a complete list of deliverables.
Open Lab
Objective
Create a basic understanding of commands, event handlers, and COmmandInputs.
Deliverables
Create an add-in for Fusion 360 that adds commands for two buttons which will appear on the toolbar and two dialog boxes.
One button, when clicked, will bring up a dialog box to run the belt calculator code from Lab 2. It needs two selectionCommandInputs for selecting two circular edges, two sliders for choosing the pulley diameter, and a non-editable text box to display the calculated belt length. It will have an associated inputChanged event handler to calculate the belt length required for the user-supplied input from the dialog. The belt length calculations will be done using your code from Lab 2.
The other button will bring up a dialog that will allow you to create pulleys on selected shafts in the 3D printer model. It needs a selectionCommandInput for selecting the cylindrical face of a shaft to which the pulley will be constrained. It needs a radio button group to allow the user to choose between Round Tooth and Square Tooth pulleys, and a dropdown to allow the user to choose the number of teeth (between 12 and 20 teeth). It will have an associated execute command to build the pulley when the user clicks “OK” on the dialog box. The round tooth pulley will be generated using the code you wrote in Lab 2. The square tooth pulley will be imported and modified using the code you wrote in Lab 3. The newly created or imported pulley will be created as a new component and constrained to the shaft selected in the dialog. Get the number of teeth and the diameter of the shaft and give those numbers to the pulley generator or importer to define the parameters of the pulley. You will need to add a few lines of code to your pulley generation code from Lab 2 to make the function that generates the pulley also return a proxy of the cylindrical face of the center hole of the pulley component.
Hints:
- The code from your run() function in your belt calculator script should go in the onInputchanged event handler for the associated dialog box. Some of that code may need to be changed a bit to work with selection command inputs. Copy your function that calculates the belt length to the end of your add-in file.
- The code from the run() functions from the pulley generator in Lab 2 and the pulley importer in Lab 3 should be copied into the execute event handler for the associated dialog box. Some of this code may need to be changed a bit to make it work in the event handler. All other functions should be copied to the end of the add-in file.
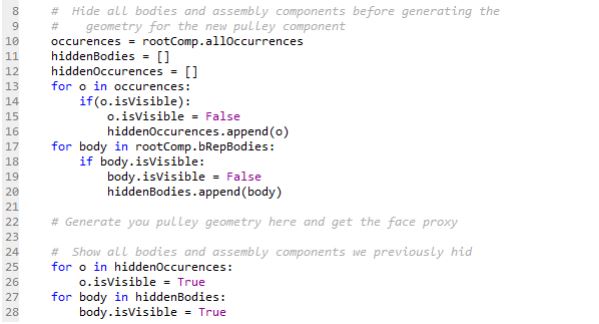
- Your pulley generating code you wrote in Lab 2 uses Boolean operations to cut the teeth and set screw holes. Boolean operations get applied to all geometry within range, even if it is in another component in the assembly. Geometry that is hidden will not be affected by Boolean operations. Your code to generate a pulley must first hide all bodies and assembly occurrences and then unhide them again after the pulley is generated. You can do that using this code:
- You will need to get the radius of the shaft selected in the second dialog box so you can properly size the pulleys. This can be done via the selected object’s geometry property. For a cylindrical face the geometry property will be a Cylinder object.
- Create a global variable of type ‘int’ to keep track of how many pulleys have been imported using your code from Lab 3. This counter should be incremented each time a new pulley is imported. This counter should be appended to the names of the model parameters in the newly imported pulley at the time it is imported (e.g. “teethNum_1”, etc.). This will prevent Fusion 360 from getting confused by duplicate parameter names. Remember these new names when you need to change the parameter values.
- This will be quite a large python file. Make sure to keep your code neat and organized. This will make it easier to find things and to debug when problems arise.
